Monday, 26 September 2011
Wednesday, 14 September 2011

Monday, 12 September 2011
Sunday, 11 September 2011
Something old, something new?!
Hello people, just checking in to let you guys know the blog ain't dead. Recently proposed to the other half so have a lot of planning to do and baby due in 6 weeks!! So enough with the excuses.
The grey knight commission if really coming along but i dont want the client to see the pictures until they are done, (yes he's a trusting friend.) But when its done ill be getting some pro help to show them off properly with a couple of sneaky ones thrown in before.
As for other bits i've decided on a long term project for myself as the arrival of other before mentioned responsibilities means that painting will happen as and when im allowed by baby and the Mrs. Its going to be a Red Scorpion army and as money is tight it will be army building on a budget utilising swaps on forums, ebay and existing bits box. Forge world bits will be accounted for from birthdays and xmas hopefully, so as well as the painting tutorials, my costs will be included so you can see if you can beat my thrifty 40k-ing.
Sunday, 4 September 2011
Caestus Assault Ram
Ok guys this model was bought when it first came out and wont see paint for a while but in the evenings when the absence of light prevents my painting ive been putting this together. IT IS A PAIN!! One of the worst made FW have produced. As you can see by the gaps ive had to fill, not to mention the amount of resin i had to dremmel off when attaching one og the nacelles. The filling is at the sanding and fine tuning stage. When paint does touch it (a while away to be honest) it will be a Red Scorpion paint job i think.
The control surfaces and magna melta will be painted and added separately.


The control surfaces and magna melta will be painted and added separately.


Friday, 12 August 2011
Adding earth pigments.
The last step is pretty similar to the first rust step. I got a mixture of pigments to give me more tonal difference which is the key to realism. I've used rubble dust, brick dust, dry mud and a tiny amount of african earth.
 Same as with the rust you now just have to literally just put it on dry with the brush at irregular intervals all over the ground.
 Next grab a fairly wide brush and load it with thinners for washes and soak and mix all the thats on the base, randomly remember and dont worry about splashing a little up the side of the building.
 It will look a little like this once done.
 Then once dry it will lighten up considerably and look like this.
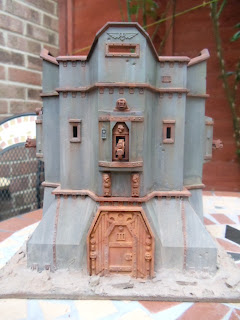
 Now we want the building to fit in with the base. This is called homologation, its tieing the entire model into one cohesive model. to do this to the building we have to be slightly more subtle about it. we have to add multiple pigments again but with a dry brush and this time we brush into the suface of the model. I didnt do it all the way up the model just halfway up the first section.
 Next you have to touch the area lightly with a brush loaded with thinners for washes and let capillary action soak it into the pigment. I then brushed it downwards to thin it out and mix the colours.
 Now when this dries it will look unnatural as the pigment will just abruptly stop.
 To fix this you take a large brush thats dry and clean and brush, rub, flick the pigment upwards blending the colours gently into the building. Once its to your satisfaction thats it. All done. Congratulations, with no massive detail work or crazy artistic skills you made a realistic building.


Thursday, 11 August 2011
Rust streaks.
Stage 3 of the bastion will need some rusty streaking!! This is very similar to adding depth to flat surfaces, you will need oils, red, orange and brown.
On your palette you will have to mix them to get a similar colour as your rust. You will need two brushes, one small one to apply the oils and one to rub off the the excess and streak the paint.
 Take your mix and then apply to the areas where you want the streaking to start.
 Now its simply a case of taking the clean medium soft brush and dipping it in some turpentine and rubbing off the excess. Now simply drag the oil in the direction you want to streak, if its too strong just keep removing the paint with soft downward strokes. If you dont like it at all then just load up with turps and rub it off completely. When your done you should end up with something like this.
 Sorry again for the bad photography but you get the idea. For ultra realism you can add a little pigment to the tops of the streaks do add more tones. By also copying this with a buff/white mix of oil paint you can get some awsome water marks too! See its easy?! Better pics will come with the mud pigments. Hopefully.
On your palette you will have to mix them to get a similar colour as your rust. You will need two brushes, one small one to apply the oils and one to rub off the the excess and streak the paint.


Subscribe to:
Posts (Atom)